Table of Contents
Abstract
This chapter describes the main mechanisms by which the UI provided by Wicket Objects can be customized.
Wicket Objects offers several ways in which the UI rendered can be customized, from simply tweaking the CSS (though this in itself can be pretty powerful) through to supporting mashups and wizards. This chapter explains each of these approaches.
CSS is used heavily in Wicket
Objects, with the HTML of each
Component using CSS classes
for the styling. But you can override the default styling by supplying
an application-level CSS file which by default should
be called css/application.css in the classpath (eg
under src/main/resources). If you want to call the
file something else, the subclass
WicketObjectsApplication and override the
getApplicationCss() method.
There are two levels at which we can override the default styling, either generically or specific to a particular domain.
The name of each class indicates the nature of what is being
rendered, and each Component provides some
default styling so that the out-of-the-box UI is
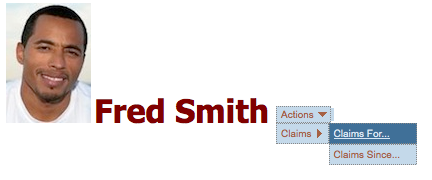
usable. For example, an entity icon, title and actions are rendered
as:

The icon and title for this are rendered as:
<div class="entitySummary">
  <img src="?wicket:interface=:4:entity:entity:entitySummary:entityImage:1:IResourceListener::"
       class="entityImage" wicket:id="entityImage">
  <label class="entityTitle" wicket:id="entityTitle">Fred Smith</label>
  ...
</div>
So, to change the font, you could use:
div.entitySummary > label.entityTitle {
  color: maroon;
  font-size: xx-large;
  font-weight: bolder;
}
This would render the entity icon and title as:
In this way you can develop a look-n-feel for the application (or perhaps your organization).
As well as targetting HTML elements generically, individual class members can also be targetted for a particular domain model.
For example, the properties of a Claim
object might be rendered as:
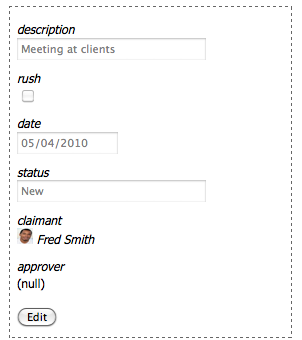
The HTML for the
description property is:
<div class="Claim-description" wicket:id="scalar">
  <wicket:panel>
    <div class="string scalarPanel">
      <label wicket:id="scalarIfRegular" for="scalarValue3d">
        <span class="scalarName" wicket:id="scalarName">description</span>
        <span class="scalarValue">
          <input type="text" title="" size="25" disabled="disabled"
             value="Meeting at clients" wicket:id="scalarValue"
             id="scalarValue3d"
             name="properties:1:scalar:scalarIfRegular:scalarValue">
        </span>
      </label>
      <span wicket:id="feedback">
        <wicket:panel>
        </wicket:panel>
      </span>
    </div>
  </wicket:panel>
</div>
To change the label of this specific element, we could use:
.Claim-description .scalarName {
  color: maroon;
  font-weight: bolder;
}
which would give us:
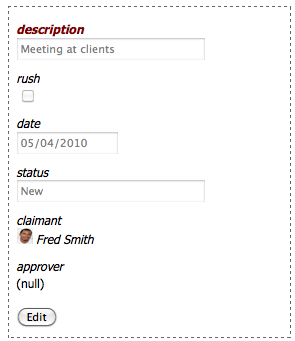
This is a slightly trite example, but demonstrates the point.